
LinkedIn is an amazing site because it allows you to post a full profile—in effect your online CV—on a busy site (364 million users and counting) without having to part with any money. Although we’ve all become accustomed to receiving something for nothing in the age of the Internet, the deal non-paying members receive is incredibly good, but not without a few drawbacks.
Premium versus free profiles
Let’s take a look at some of the benefits of paying for the service so you can understand what I mean.
LinkedIn offers four main premium plans (Sales and Recruiter include enhanced versions) in addition to the free option the vast majority of us take advantage of. Below is a table demonstrating how they compare. And this short slide show also points out the major differences between premium and free profiles.
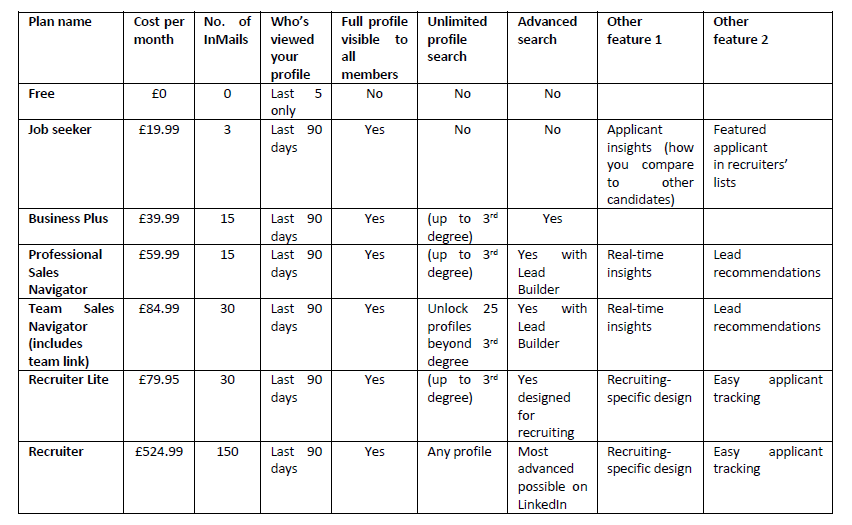
As you can see from the above, it costs £39.99 a month for the Business Plus plan (I don’t think the cheaper Job Seeker plan offers enough benefits to be of any real interest to us translators), which is quite steep. You get to send 15 messages to people you’re not connected with, see everyone that’s viewed your profile and how they found you (keywords) rather than just the last five, access an advanced search with additional filters and unlimited profile search (up to 3rd degree), and anyone can see your profile.
While it might be helpful to see the full list of who has viewed your profile in the past 90 days, as long as you visit LinkedIn often enough, you will still find out this information. Therefore, IMHO, the most important feature we miss out on with free membership is sending InMails. If you’re not connected to the person you wish to contact and you don’t have access to InMails or Open Profile Messages (both premium features), you either have to ask a mutual connection for an introduction or send an invitation to connect. And if your potential client doesn’t pay for membership either, then they’re in the same boat.
Judging by the countless emails I receive to try premium membership for one month for free, LinkedIn would prefer us all to pay to use the site, so we’re encouraged only to connect with people we know. But following that piece of advice will narrow our possibilities of meeting new clients. Because we need connections to broaden our network, our visibility and our chances of being found and landing a job (don’t forget that even paying members—except for the enhanced Sales and Recruiter options—only get up to third-degree searches).
Sending invitations
Now let’s take a look at the invitation process.
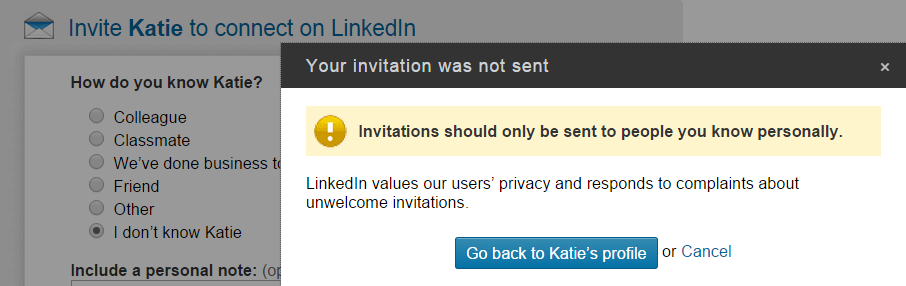
 After you click on the “Connect” button, you’ll see the screen on the left asking you to choose one of six options and also giving you a chance to add a personal note (I’ll talk about this in more detail below).
Note also the warning not to invite people you don’t know well. Although many of us ignore this so we can work LinkedIn to our advantage, it does involve taking a risk, as you discover when you click on “Find out why”. If the recipient indicates “that they don’t know you”, “you’ll be asked to enter an email address with each future invitation”. In actual fact, a number of site users will have to label your messages as spam or say they don’t know you before your account is restricted in this way.
 If you click on either the “Colleague” or “We’ve done business together” option, you’ll be asked to choose a company from the dropdown menu, which shows your current place of work, all your past ones and an “Other” option. Choosing the latter asks you to supply a new company and job title, which will then be added to your profile. Very few of these options are ever going to be relevant when trying to connect with a fellow freelancer.
“Classmate” can obviously only be chosen if you both went to the same school or university. “Other” will ask you to enter the email address of the person you wish to connect with, which you may not have. And the perhaps truthful “I don’t know XYZ” option will lead you to the screen below and no further.
That effectively leaves us with no other choice but to opt for “Friend” and then keep our fingers crossed that the recipient won’t object. Unfortunately, as that is not a remote possibility, you need to try to make sure it doesn’t happen by personalising your introduction. Briefly explain why you want to connect, where you found out about them (conference, Twitter, Facebook, their blog, etc.) and/or mention a shared contact, group or association, etc.
Please also bear in mind that there are limits on the number of invitations you can send, although this is currently set at an extremely generous 5000. If you should need to send more and haven’t abused the system, then LinkedIn will consider extending your limit.
Another means of contacting someone you are not connected with on LinkedIn is via groups. If they have made a comment on a discussion, you can click on “reply privately” to write to them. You must both be members of the group in question and you can only send 15 of these messages every month.
Think twice before rejecting an invitation
Sometimes LinkedIn doesn’t provide you with an option to add any lines to your request. For example, if you search for someone by name and click on the blue “Connect” button in the list of results, the message is sent automatically (once you’re aware of this, it would be better if you visited the person’s profile page and followed the process I’ve described above). That’s one of the reasons why you shouldn’t blanket ignore requests that are not personalised. Another, in my experience, is that people often write a detailed message after I’ve accepted them instead of before. Perhaps they feel there’s not enough space in the note for a proper explanation or perhaps they don’t see anything wrong with the generic invitation. Regardless, if you’ve created a page on LinkedIn to advertise your services, be open to the opportunities that present themselves. Don’t cut off your nose to spite your face and reject a request just because the sender doesn’t contact you in the way you think they should.
Removing connections
After connecting, if your new contact proves to be dodgy or not someone you wish to associate with because they send spammy messages, for example, then it’s easy to disconnect. When you place your cursor in the box containing this person’s details in your list of connections, some options (“Tag”, “Message” and “More”) will appear. Clicking on the small arrow next to “More” will give you the “Remove connection” option you need. LinkedIn does not notify people when you remove them, and they cannot re-initiate the connection either.
On the subject of spam, don’t write to every translator you connect with offering your services. We’re all busy and this type of contact is only likely to make you stand out for the wrong reasons and even get you disconnected. If you want to grab your new contact’s attention, think of something else to say, such as a compliment, a question about one of their groups or a course they’ve done. Be personal, be interested, be friendly, be polite, just don’t be in their face.
LinkedIn Pointers – Part One: Photos and Headlines
LinkedIn Pointers – Part Three: The “Meaty” Sections
Explore this blog by starting with the categories page

One thought on “LinkedIn Pointers – Part Two: Connecting and Netiquette”